How to Lash a Blade to a Handle
Quick Summary
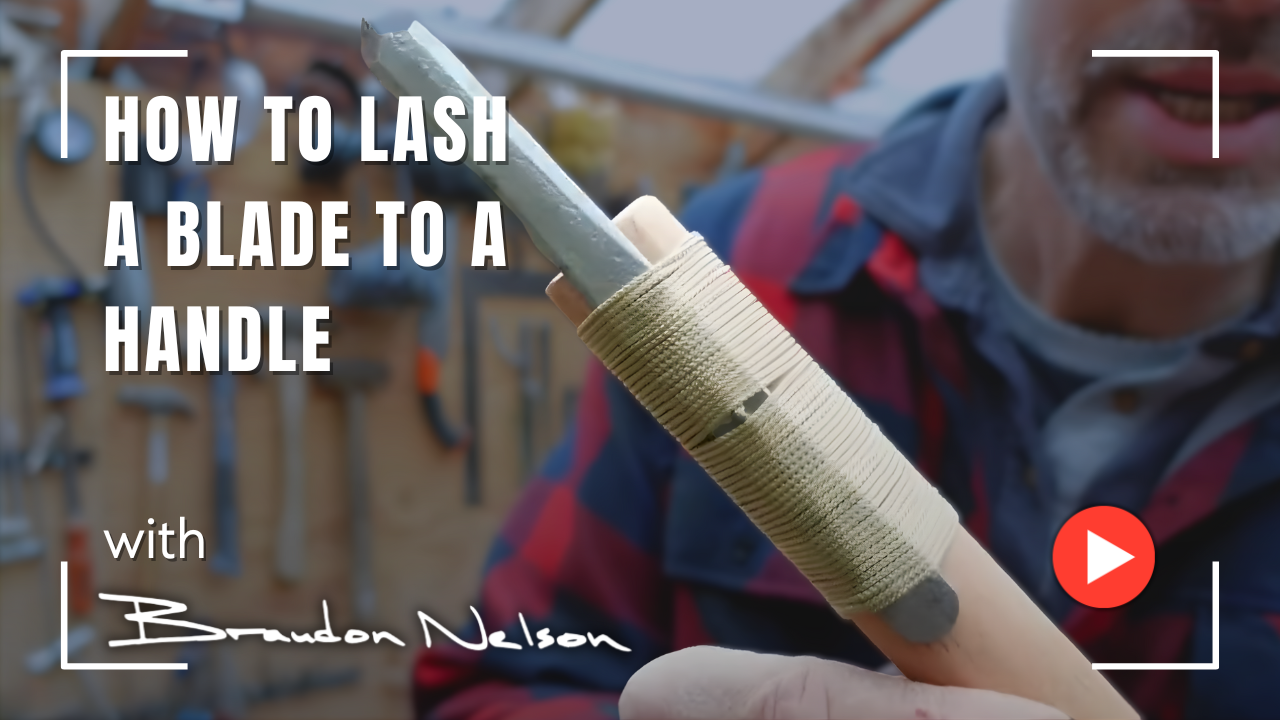
This video teaches a precise lashing technique for securely attaching a blade to a wooden handle using twine. You will learn the specific sequence of wrapping, creating a loop, and using a hidden pull mechanism to lock the binding in place. Viewers should master this method because it results in a connection that is described as "rock solid." Furthermore, the lashing ends are completely hidden and locked beneath the wraps, creating an extremely durable, professional-looking, and fully functional tool.
What you'll need and what to do
To try what's taught in the video, here's what you'll need and the exact steps to follow.
What You Will Need
• Wooden handle
• Blade
• Twine (or line)
• Vise (to hold your work)
• Cutting blade/tool
Action Steps
1. Get the handle secured in your vise.
2. Lay the blade right on top of the handle.
3. Play out about 24 inches of line.
4. Make a loop at about the 24-inch mark in the string.
5. Lay the loop right on top of the blade.
6. Come back to the front and make two or three wraps around the whole package to hold it all in place.
7. Continue making neat wraps, nice and close to each other, all the way along the length of the entire blade.
8. Cut the line about five inches from the handle.
9. Take that new cut end and put it through the loop coming out the back.
10. Take the 24-inch tail and wind it around your spool to use it as a handle.
11. Pull on that handle so the loop grabs the new cut end and pulls it underneath all the tight lashings.
12. Stop pulling when you get halfway.
13. Trim the front tail end with a blade.
14. Trim the back tail end with a blade.
Word for word video transcript
Hey everyone Brandon Nelson and in one minute I'm going to show you this lashing technique to attach a blade to a handle all you need is the wooden handle the blade some twine and then a vise to hold your work just get the handle secured in your vise and then lay the blade right on top of the handle and I'm gonna play out about 24 inches of line okay at about that 24 inch mark in the string I'm going to make a loop and I'm going to lay it right on top of the blade then I come back to the front and make two or three wraps around the whole package to hold it all in place there's a look at what we have okay everything's bound into place I've got my tail coming off the end off the front of the blade I've got my three or four wraps holding it all in place and my loop is coming out the back now I'm just going to take my time and continue making those neat wraps nice and close to each other all the way along the length of the entire blade here's a look at what we have now we still have that 24 inch tail coming off the front we have all of our neatly wound lashings and then we still have the loop coming out the back we're gonna cut the line about five inches from our handle and we're gonna take that new end and put it through our loop just like this now take that 24 inch tail and wind it around your spool to use it as a handle and we're gonna go ahead and pull on that handle and watch what happens that loop grabs that new cut end and starts pulling it underneath all those tight lashings when you get halfway stop that's all you want to go halfway now we just come in with a blade we're going to trim that tail in and we're going to trim this tail on this end and there you go that blade is rock solid the ends of the lashing are hidden and completely locked in place this has been Brandon nelson for one minute I'll see you next time
Learn more with Brandon in One Minute